Compensation Setup For High Content DURAClone Reagents
Introduction
High content flow cytometry owes its high value as a powerful method in clinical research to the availability of an expanding menu of tandem dyes enabling a large number of simultaneous
parameters. However, degradation of tandem dyes over time due to light and oxygen exposure and eventually inappropriate storage conditions can severely affect their emission spectra and may
result in the need for frequent compensation adjustment. Furthermore, manufacturing-dependent spectral variability may occur in tandem dyes that could require lot-specific compensation settings.
With the DURAClone format Beckman Coulter Life Sciences introduced a new proprietary dry reagent formulation that secures long-term fluorochrome stability while stored at room temperature. As both, the multicolor panel and its corresponding single color conjugates, are provided in this dry, unitized and stable format a high level of standardization in studies conducted at multiple sites and over
time courses can be effectively achieved. Instrument set-up including accurate and precise compensation is easy and can be managed by non-experts. The following paragraphs describe this procedure for Navios flow cytometers as well as a daily check of the instrument setup.
Materials
Dry tube formats of the multicolor panel and the single color conjugates for PMT and compensation settings are provided with each DURAClone tube. Additional materials as listed in table below are required:
| PN RUO / CE-IVD | |
| Flow-Check Pro | A69183 / A63493 |
| Flow-Set Pro beads | A69184 / A63492 |
| Versalyse | IM3648 / A09777 |
| IOTest3 fixative solution | IM3515 / A07800 |
| VersaComp Beads | B22804 / - |
Method
Sample Staining
For staining of samples with the dry antibody cocktail please refer to the instructions for use included in the DURAClone IM Kit.
Single color staining for compensation setup:
- Pipet 100 μL of whole blood onto the bottom of each of the tubes that contain dry single color conjugates.
- ECD, PC5.5, PC7, APC-AlexaFluor** 700, and APC-AlexaFluor** 750 antibody conjugates are identical (lot-matched) to the conjugates contained in the dry cocktails. Please note that these lot-matched antibodies may be directed against weakly expressed antigens or antigens found on cells that occur only at low frequency in normal samples. In these cases it is recommended to add 1 drop of well-mixed “VersaComp Antibody Capture Positive Beads” to the respective sample in order to introduce a positive bead population.
- Vortex each tube for 6-8 seconds.
- Incubate in the dark at room temperature (20 –30°C) for 15 min.
- Add 2 mL of VersaLyse Lysing Solution to each tube and vortex at high speed immediately for 1-3 seconds.
- Incubate at room temperature for 15 minutes. Let tubes sit, protected from light.
- Centrifuge the tubes at 200 x g for 5 minutes and discard the supernatant by aspiration.
- Re-suspend the pellets by addition of 3 mL of PBS to each tube.
- Centrifuge the tubes at 200 x g for 5 minutes and discard the supernatant by aspiration.
- Re-suspend the pellets by addition of 0.5 mL of PBS supplemented with 0.1% of IOTest3 fixative solution to each tube.
- The samples are now ready for acquisition
Flow Cytometry Acquisition: Initial Application Setup
PMTs settings
- Create an acquisition protocol for the respective DURAClone multicolor panel by creating a scatter (FS, SS) plot and histogram plots corresponding to the detector channels of interest. Insert a gating region into the scatter plot, gate all other histograms on this region.
- Deselect unused channels in the protocol definition (access through button “Parameters” in Cytometer Control Acquisition Setup tab).
- Save protocol as “PMT Setting_DURAClone xxx” replacing xxx by the name of the panel, e.g. “ IM B Cell’.
- Run single color tubes to set-up PMTs. During each run with a single color tube (consider to activate “setup mode” in the Cytometer Control Acquisition Setup tab) adjust the voltage of the detector assigned to this single color to obtain a numerical median of 0.3 for the negative lymphocyte population.
- Run Flow Set-Pro beads using these settings. Decrease FS discriminator to assure visibility of the singlet beads population (e.g. set FSC discriminator to a value to 10).
- Record X-Mode values of the bead population for each channel.
- Calculate and take notes on the X-Mode ± 10% value
Auto-Standardization Panel Creation
Before initiating Auto-standardization Panel Creation, verify that all dyes are appropriately defined in the “Custom Dye Entries” from the Tools pull down menu.
- Selection of dyes
- Select “Custom Dye Entries” from the Tools pull down menu (Figure 1).
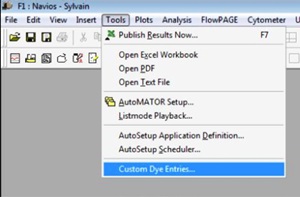
Figure 1
- Following window opens (Figure 2).
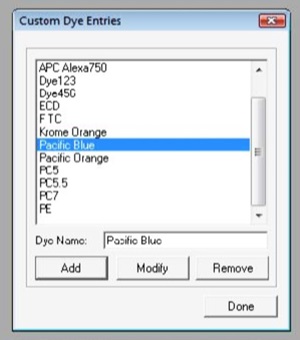
Figure 2
- If not yet included in the list, type the name of missing dyes in the dye name entry
- Select Add
- Repeat step for additional dyes
- Select Done
- Select “Custom Dye Entries” from the Tools pull down menu (Figure 1).
- Create an acquisition protocol “DURAClone xxx.pro” replacing xxx by the name of the panel, e.g. “ IM B Cell’. Please make sure to include the plots of interest for the intended application, respectively, including suitable stopping conditions. This protocol can be used as data acquisition protocol and as verify protocol in the AutoSetup Application Definition.
- Define Autosetup
- Select AutoSetup Application Definition from the Tools pull down menu (Figure 3).
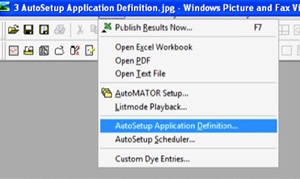
Figure 3
- In the next window, select radio buttons “Create a new application definition” & “Current user only”, then select NEXT (Figure 4).
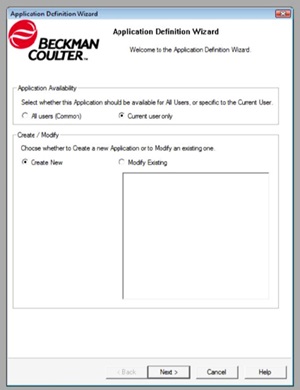
Figure 4
- To select “PMT Setting_DURAClone xxx.PRO” as Base Protocol (created under II.A.3.) for the application, proceed as follows:
- Browse: locate your acquisition protocol folder and open
- Select: “PMT Setting_DURAClone xxxPRO”; open
- Verify that the protocol summary includes the appropriate parameters (Figure 5):
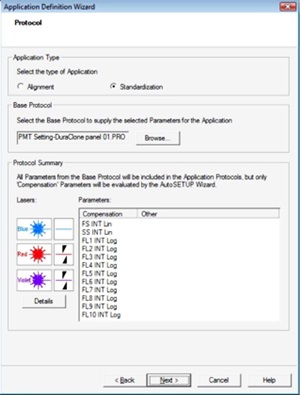
Figure 5
- Select NEXT
- Select: This application uses Standard Filter Block & select NEXT (Figure 6).
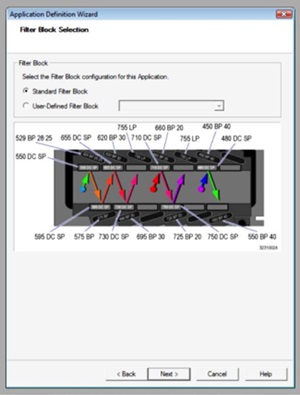
Figure 6
- Select dyes and/or verify that the appropriate dyes are indicated, select NEXT (Figure 7).
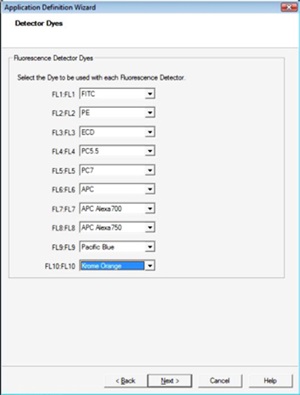
Figure 7
- In the following windows, please leave the default X-Mode targets for Flow-Set Pro unchanged, select NEXT (Figure 8).
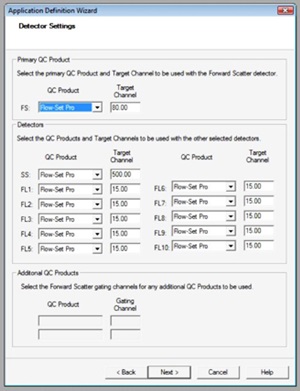
Figure 8
- Enter the Application name: “AS DURAClone xxx” replacing xxx by the name of the panel, e.g. “ IM B Cell’ (it is recommended to begin the name with “AS” to help structuring your protocol folder contents) and select NEXT (Figure 9).
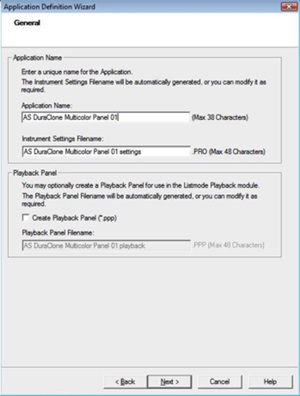
Figure 9
- Verify that the “Create a verification Protocol” box. is not matched (Figure 10).
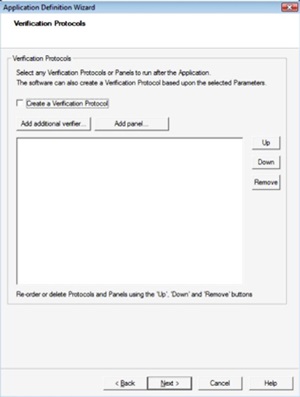
Figure 10
- Select add additional verifier and choose the protocol “DURAClone Verify xxx.PRO” as verify protocol (Figure 11).
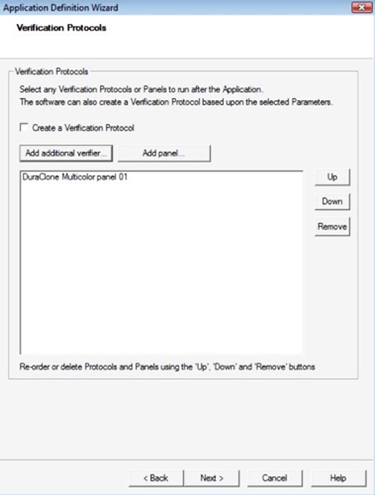
Figure 11
- Select NEXT on the following window
- Select FINISH and verify the Application Definition Report (Figure 12).
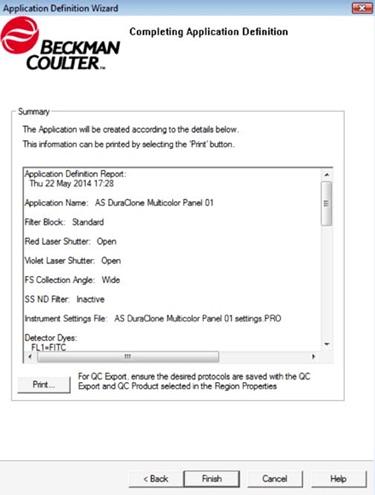
Figure 12
- Select AutoSetup Application Definition from the Tools pull down menu (Figure 3).
- Target ranges entry
- Open “AS DuraClone xxx_STAND.pro”
- Right click on linear regions in each of the histograms, select region properties and enter the calculated X-Mode ±10% values for each channel (sees section II.A.7)
- Save Protocol
Compensation Settings
- Run autosetup scheduler
- From the Tools bar menu, select "AutoSetup Scheduler" (Figure 13).
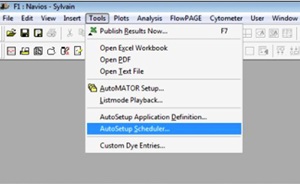
Figure 13
- Select the “AS DURAClone xxx” -autosetup and enter the carousel number (Figure 14).
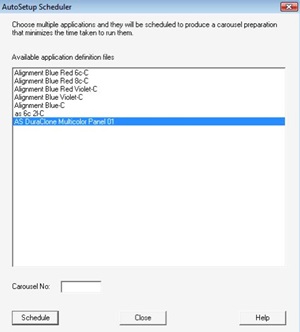
Figure 14
- Select Schedule
- Following Window will pop up (Figure 15):
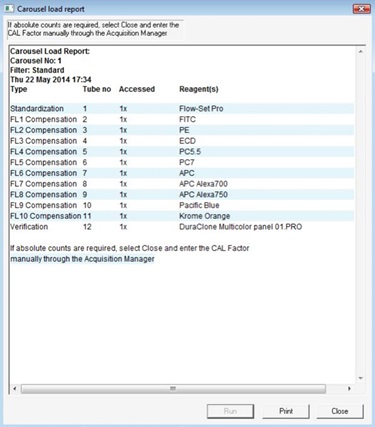
Figure 15
- Select Close to close the window.
- The worklist is created in the Application Manager window, please complete the worklist as follows:
- Fill the sample ID 1; this name will be repeated for all tubes.
- Fill the sample ID 2 following the tubes order indicated in the worklist protocol column
- Position 1: FSP lot
- Following Positions: different single color tubes
- Last position: DuraClone Verify Multicolor tube
- Add 10 to 20 drops of Flow-Set™ Pro beads in Tube 1
- Use the carousel to load appropriately corresponding tubes.
- Run Application
- In the AutoSetup Wizard window, uncheck “Automatically approve Steps”
- Check “Auto adjust disable”
- Acquire without changing PMTs voltages
- After acquisition is completed, click “Next”
- Adjust the gating region in scatter plot to Lymphocytes population or VersaComp beads
- Adjust positive region in fluorescence histogram to center positive peak only, click “Next”
- Repeat the two previous steps (7.5.5-6) for each single color tube
- Run the Verify Multicolor tube and inspect plausibility of patterns and populations
- Approve and save settings if you can confirm plausibility of staining patterns or repeat section C skipping 7.3 in case of implausible staining patterns (Figure 16).
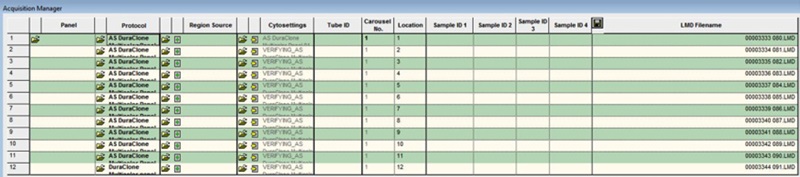
Figure 16
Flow Cytometry Acquisition: Routine Use
Stability of PMT output signals will be checked by running Flow-Set Pro beads before routine use.
- Open the AS_DURAClonexxx_STAND.pro protocol.
- Run (only) Flow-Set Pro beads
- After acquisition is completed, inspect peak positions
- Case 1: Targets are matched
- Print plots and settings
- Open the acquisition protocol “DURAClone xxx.pro”and run samples with previously saved cytosettings. It is recommended to create a worklist with informative entries in the sample ID columns.
- Case 2: Targets are not matched
- Print plots and settings
- Click rerun
- Adjust unmatched PMTs by incrementing respective voltages in steps of 5 Volts until targets are matched
- Click “Acquire”
- After acquisition is completed, inspect peak position
- If targets are not matched, repeat 3.2.2. to 3.2.5.
- Click “Abort”
- Print plots and new settings
- Open the acquisition protocol “DURAClone xxx.pro”, enter new PMT settings and save protocol
- Run samples. It is recommended to create a worklist with informative entries in the sample ID columns.
- Case 1: Targets are matched
* Navios is CE marked for 10-color in-vitro diagnostic use. In the U.S., Navios is intended for use as an in-vitro diagnostic device for immunophenotyping with Navios tetra software and CYTOSTAT tetraCHROME reagents. All other uses are for research use only.
**Alexa Fluor is a trademark of Molecularr Probes, Inc.
DuraClone, Navios, Flow-Set Pro, Beckman Coulter and the stylized logo are trademarks of Beckman Coulter, Inc. and are registered with the USPTO.
For Research Use Only. Not for use in diagnostic procedures.
